There’s a new chocolate in town.
Stratford’s Chocolate Trail is obviously sweet, but now there’s a new shop where we can do more than just buy chocolate, we can make it!
I get my trusty side-kick to drive me just outside town to Shakespeare. And there it is: Chok. It looks like a big block of chocolate. Inside, it smells like chocolate. But it doesn’t look like a typical chocolate shop. It looks like a kitchen and a laboratory.
There are two different kinds of workshops here. In the Bonbon Making Workshop you can fill chocolates with a Canadian collection of fillings: Newfoundland Screech Caramel, Cape Breton Ginger and Molasses, Quebec Maple Pecan, Ontario Butter Tart, Saskatchewan Three Layer Saskatoon Berry Cheesecake and BC Nanaimo Bonbon. It’s like a tour of Canadian flavours.
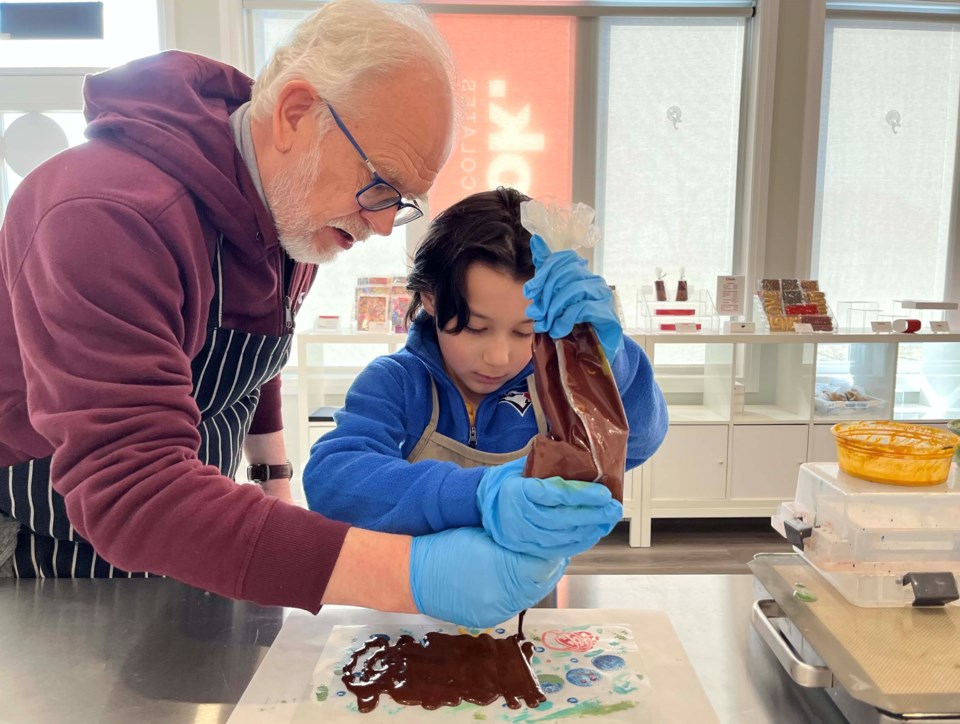
The workshop that I’m doing is called Chok for Kids. My host and chocolatier, Stephen Beaumont, hands me an apron and a pair of gloves. This might get a bit messy.
Stephen has been tempering cocoa butter. That means heating it and cooling it to very specific temperatures so that it reaches the right thickness. He’s also added colour, so that I can paint with it. On the counter in front of me is a clear sheet of acetate. The cocoa butter is all tempered so that it won’t get stuck to the acetate that I’m painting.
I have five containers of coloured cocoa butter to paint with: turquoise, yellow, green, red and blue. And I have different tools to use for painting: Q tips, paint brushes, a tooth brush, a dauber, a sponge, and my fingers! You can make a mess on the acetate, and it’s freeing, because whatever you do, you can have fun with colour and it ends up looking really cool. I painted smiley faces, scratched random lines and dabbed starbursts.
Now that I’ve painted my masterpiece and let it dry, I get to do the most satisfying part. I hold up a big piping bag of melted chocolate. We cut the tip off to pour the chocolate. I really would love to pour the whole thing into my mouth, but instead I pour it onto the acetate. Then, while the chocolate is still wet, I add decorations to it, called inclusions. I sprinkle smarties, chocolate theatre masks and little sour hearts.
The next step is to cool the chocolate in the fridge for about ten minutes. This process is called crystallization. It’s all about the Beta 5 crystal. This is a good crystal that creates a microscopic web, like a spider web, that holds the chocolate together, so that when you break it, it creates a nice snap.
Did you know that when your chocolate has a whitish coat on the surface, it means that the chocolate has been too cold, and so the fat crystals have bloomed or separated from the chocolate?
After we take the chocolate out of the fridge, we slowly peel the sheet of acetate off of it to reveal my glorious design! Finally, I break apart my chocolate bark and box it up to share with my friends.
By the way, this dark chocolate is made up of cocoa solids, cocoa butter and sugar. That’s all there is. So, it is gluten free!
Stephen tells me that his life motto is, “No experience is bad experience,” because we learn through experience. What I learned from this kid’s workshop is how chocolate is made, and all the effort to make something that seems so simple. There is a real science to it, like with getting the temperatures just right, and there is also a really creative side, so it’s interesting and fun.
It’s true what they say, “Life is sweeter with chocolate.”


